• Home
  • Products
    • TunerStudio MS
      • Registered TunerStudio Advantages
      • TunerStudio Articles
    • MegaLogViewer
      • MegaLogViewer HD
    • Shadow Dash MS
      • Requirements
    • TS Dash
    • Connectivity
  • Support
    • FAQs
    • Manuals
      • Developer Manuals
    • MegaSquirt Forums
    • How To Videos
    • User Reviews
  • Downloads
    • TunerStudio Change Log
    • MegaLogViewer Change Log
  • Editors
    • Login
  • About EFI Analytics
  1. Home
  2. Products
  3. TunerStudio
  • Home
  • Products
    • TunerStudio MS
    • MegaLogViewer
    • Shadow Dash MS
    • TS Dash
    • Connectivity
  • Support
  • Downloads
  • Editors
  • About EFI Analytics

MegaSquirt 3 SD Card Console in TunerStudio MS!

Now included in Lite! Edition of TunerStudio!

For all you MegaSquirt 3 users, I know you have been waiting for this...

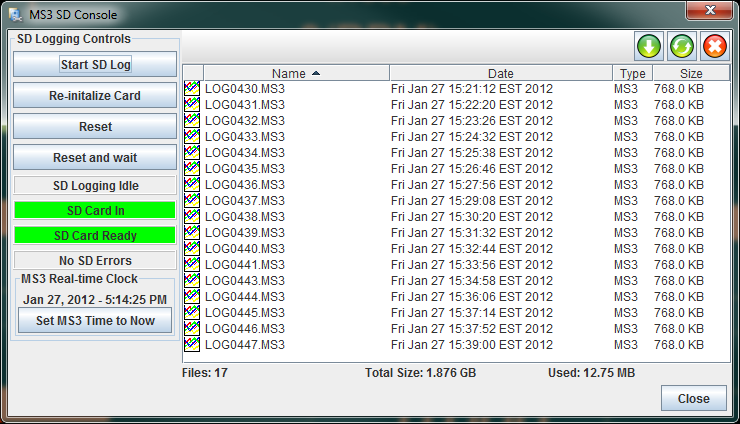
Now there is no need to need to remove you SD card. While TunerStudio Lite! has basic download and delete function for the MS3 SD card, registered Users can Browse, Download and delete MS3 SD files through TunerStudio MS.Downloads automatically convert the MS3 files to standard MSL files so they are ready to open in MegaLogViewer MS!


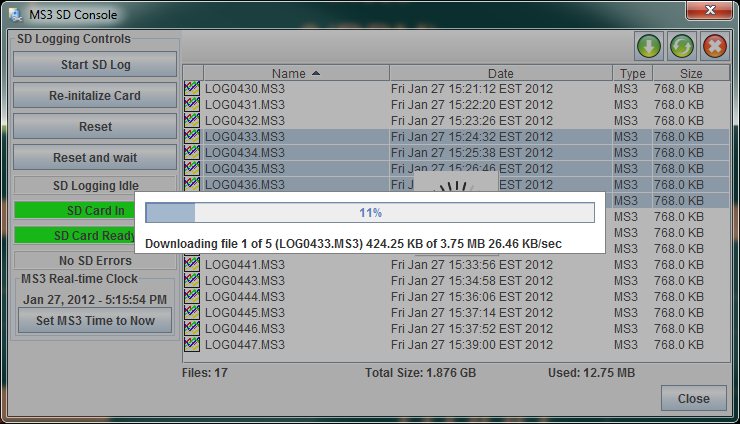
New to TunerStudio 2.3 and up and MS3 1.3 firmware - Turbo Baud. During file downloads, TunerStudio and the MS3 both kick the baud speed up to 230k baud to double the download rate.

MS3 SD Console

Get the TunerStudio MS Beta Here

Get the latest MS3 alpha Firmware Here

MS3 SD Console Downloading

Cables and Adapters

Connectivity Solutions


 See all our Connectivity Products in our Store


Save yourself the trouble of USB cables and Bluetooth Adapters that don't work or require additional setup. EFI Analytics offers Bluetooth Adapters and USB to serial cables that meet our criteria and have been tested to work.


Wireless MegaSquirt via Bluetooth

 Out of stock!


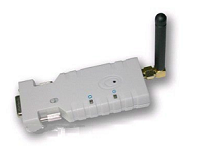
Class 1 RS232 Bluetooth

Proven, tested and pre-configured to work for your Android phone and MegaSquirt. When working with RS232 over bluetooth you quickly find that RS232 Bluetooth Adpaters vary greatly. With Bluetooth you will always see slower read rates than with a cabled connection, but with a good bluetooth adapter, bluetooth is plenty fast at 20+ reads persecond with some firmwares. However we have seen significantly lower data rates when using some devices, as much as 45% few reads each second.  More commonly a newly purchased Bluetooth Adapter will not work at all until you figure out the configuration settings that are needed.

This is why we tested many to find one that out performed all others tested, then preconfigure them so it will work for you out of the box.

- Class 1 range (100 meters), so even with all the obstacles of a car, you can still tune outside the car and from a distance.
- Preconfigured for your MS1, MS2 or MS3
- No Need for Modification to your MegaSquirt or MicroSquirt!
- Highest read rate of any Bluetooth Adapter we've tested.
- Powered by Pin 9 on
v3.0 or v3.57 board or use an included power adapter.
- Certified for use with Shadow Dash MS and Shadow Logger MS on Android

Product Setup Instructions (download)
Product Manual
(download)


Tested USB-Serial Cable

Now Available in Micro-USB for tablets and Android Phones!


USB to Serial Cable


Insure reliable connectivity, use a tested cable! Current laptops rarely have real serial ports, utilizing USB port instead.The trouble is, USB just isn't an automotive standard, the lower 3.3v signal is much more susceptible to the high levels of Electro-magnetic Noise that exists inside many cars, especially race cars with high output ignitions!
 

Stop wrestling with connectivity issues, this USB to serial cable is built to our specifications and tested to work with TunerStudio
Featuring:
- FTDI chipset found to be the most reliable
-
Well shielded 3-foot cable to prevent most EM noise issues
- Solid connectivity and is well shielded to prevent most EM noise issues.
- Support for Windows 8, Windows 7, Windows Vista, Windows XP, Mac OS X & Linux


Micro USB
For Android with no OTG
$24.95 $18.95 
Add to Order

Standard Type A
For most Laptops and PCs
$24.95 $17.95 
Add to Order


Changing Gauge Limits

For registered users changing the limits of a gauge is very simple, First you must put the dash in Designer Mode:

  • Right Click on the dashboard
  • Select Designer Mode

Once in Designer Mode you can change any attribute of a gauge by right clicking on it and selecting from the Properties Menu. So for example to change the max RPM and red line of a Tachometer:

  • Right Click on the Tachometer
  • Select: Dashboard Designer --> Properties Dialog --> Gauge Limits & Values

A dialog will open with a minimum, maximum, low warning, high warning, high critical. For a tachometer, the high warning would equate to the "Yellow" line and the high critical would equate to the "Red" line. You can change these values to anything that suits your setup.


Gauge Templates and Lite! users - To adjust the values applied by "Gauge Templates" or for users of TunerStudio Lite! the ini files must be edited.

The specifics of editing your ini file is dependent on your firmware, the names and values of variables are not necessarily the same for one firmware as another. So you will need to look at your ini and deduce what row needs to be edited. To see your firmware ini you will need a text editor such as notepad, or my preference is TextPad. Open the file:

{YourProjectFolder}\projectCfg\mainController.ini

Do a search for

[GaugeConfigurations]

This defines the beginning of the section where all Gauge Template parameters are defined. By looking through this section you will likely find a row with the label values to reveal itself as the Tachometer. For example in an ini for an MS3 firmware this record is found:

tachometer        = rpm,           "Engine Speed",       "RPM",     0,  8000,    300,   600, 3000, 5000, 0, 0

The break down of each value is as such:

Define a gauge's characteristics here, then go to a specific layout
block (Tuning or FrontPage) and use the name you've defined here to
display that gauge in a particular position.

Name  = Case-sensitive, user-defined name for this gauge configuration.
Var   = Case-sensitive name of variable to be displayed, see the
OutputChannels block in this file for possible values.
Title = Title displayed at the top of the gauge.
Units = Units displayed below value on gauge.
Lo    = Lower scale limit of gauge.
Hi    = Upper scale limit of gauge.
LoD   = Lower limit at which danger color is used for gauge background.
LoW   = Lower limit at which warning color is used.
HiW   = Upper limit at which warning color is used.
HiD   = Upper limit at which danger color is used.
vd    = Decimal places in displayed value
ld    = Label decimal places for display of Lo and Hi, above.

So in the case of the tachometer, the break down of each component is:

Name               Var      Title                  Units      Lo     Hi     LoD    LoW   HiW   HiD vd ld
tachometer   = rpm,   "Engine Speed",   "RPM",     0,  8000,    300,   600, 3000, 5000, 0, 0

The name of this gauge is specific to the firmware ini and may not be called tachometer in your ini, however the title will be the txt that you see rendered on your dash, tus is likely an easy identifier.

For this tachometer gauge you can see that there is a hi and a lo defined, the hi is what you would edit to change the maximum for your tachometer Gauge Template, change HiDvalue to adjust your red line. Once edited and the project is reloaded, the new values will be part of the Gauge Template, by right clicking on any Gauge, selecting the Gauge Template for Engine Speed, the new values will be applied.

Important:

While you can edit directly in your mainController.ini file that is not recommended. Any firmware upgrade will over write that file and your changes will be lost. Instead it is recommended that you make you change in a new file called custom.ini in the same directory as mainController.ini. You can add only the edited lines and section headers, all changes in custom.ini will over-ride what was in the mainController.ini file.

So to solve for the above, create a new file in your text editor. In it put this text:

[GaugeConfigurations]

tachometer        = rpm,           "Engine Speed",       "RPM",     0,  8000,    300,   600, 3000, 6000, 0, 0

Now save that file to:

{YourProjectFolder}\projectCfg\custom.ini

With this new custom.ini you will have effectively changed the red line of your tach to 6000 RPM's.
TunerStudio User Reviews

See for yourself what users have to say about TunerStudio and VE Analyze Live! Tune For You:

BMW E28 Users

Volvo Turbo Bricks Forum

Wally & Sue in a big RV

TunerStudio MS

In today's world the most important tools for tuning are no longer found in your toolbox. Just think, in the 1980's Top Fuel dragsters made 2500 hp using a 500 cubic inch ( 8.2 Liter) Aluminum Hemi headed engine, as amazing as this might sound, today this same displacement and very similar looking hemi headed engines are making over 10,000 hp! Why? Technology and the best analytical tools have given an understanding of engines that simply was not available in the past. It is all about optimizing all aspects of the engine to improving efficiency. This demands the tools to gather data so you can understand what is happening inside the engine and identify opportunities to improve efficiency.

Compare TunerStudio Editions

Download TunerStudio MS Lite Free!
or
Register Online Now!
Add To Cart

Read more: TunerStudio MS

  1. Benefits of Registering TunerStudio
  2. Performance, Drivability & Efficiency. Simplified!

Page 6 of 7

  • 1
  • 2
  • 3
  • 4
  • 5
  • 6
  • 7
EFI Analytics, Inc © 2023