• Home
  • Products
    • TunerStudio MS
      • Registered TunerStudio Advantages
      • TunerStudio Articles
    • MegaLogViewer
      • MegaLogViewer HD
    • Shadow Dash MS
      • Requirements
    • TS Dash
    • Connectivity
  • Support
    • FAQs
    • Manuals
      • Developer Manuals
    • MegaSquirt Forums
    • How To Videos
    • User Reviews
  • Downloads
    • TunerStudio Change Log
    • MegaLogViewer Change Log
  • Editors
    • Login
  • About EFI Analytics
  1. Home
  2. Products
  3. TunerStudio
  • Home
  • Products
    • TunerStudio MS
    • MegaLogViewer
    • Shadow Dash MS
    • TS Dash
    • Connectivity
  • Support
  • Downloads
  • Editors
  • About EFI Analytics

Data Log Profiles

Data Log Profile: By default when you data log all fields defined by the firmware developers are included in your data logs. For most typical tuning, data logging the complete set of fields is fine and insures the broadest set of data fields is available for later review. However you may choose to data log only a subset of the available fields in order to achieve a faster data rate* or decrease disk usage. Data Log Profiles provide you with this ability.

*With many older firmware, Logging a subset of fields will not improve data rate because retrieving all runtime data in every read is the only model supported. However with firmwares that support partial runtime reads you will achieve higher data rates.
 - MS2 Extra version 3.3+ (with CAN_COMMANDS On)
 - MS3 1.3+ achieves substantially higher data rates.

Creating and Editing Data Log Profiles data
From the Main Menu select:
Data Logging --> Data Log Profiles

datalogProfiles DefaultProfile

The Default Data Log Profile includes all fields and they will be displayed on the right under "Logged Fields". This is a special profile that is not user ediable.

Creating a Data Log Group - By Clicking on the Add Data Log Profile Button (+), you will be prompted for the name of your new profile.

datalogProfiles NewProfileName

Once entered, it will appear in the drop down at the top.

Initially the fields will look the same as the Default Profile, however they will now be editable.


datalogProfiles NewProfile


You may remove fields moving them to the left hand "Not Logged" list using the < or << buttons or add the back to the logged list with the > or >> buttons

To delete a Logging Profile; click the datalogProfiles DeleteProfile Button.

With multiple profiles you may switch between them and edit them while the dialog is open. All changes will be save when you click Accept.

Important: When you close the dialog with the accept button, the selected profile will be used for logging sessions within that project.

Automatic Logging

Available in TunerStudio 2.3+ and Shadow Dash 1.16+


Want to start logging when you foot goes down to capture every wide open trip?

May you want to stop logging when the engine shuts down, now you can set this up with basic simple triggers or if you aren advanced user you can make the conditions as complex as your heart desires.


Set any conditions to start and stop data logging.


Automatic Logging:

The automatic logging feature allows you to set up logging to automatically start and stop when conditions you define occur.

auto loging enable

Auto Logger Setup :

To set up the auto log feature go to the "Data Logging" drop down menu and click
on "Automatic Logging"  . Once the automatic logging dialog is open you will

need to click on the Enable box at the upper left hand corner .


You can set up the auto logging feature many different ways.
The simple method has a drop down menu with a very log list of optional engine
parameters to choice from . Once you have picked which engine parameter you
would like to trigger your data logging you can then pick from a list of three options  .

    "Engine Parameter"  >  grater than your entered value .

    "Engine Parameter"  =  equal to your entered value .

    "Engine Parameter"  <  less than your entered value .

If you want to make a custom condition that will turn your logging on or off
then you can select the "Expression" option and enter a equation .

auto loging window


EXAMPLE : If you want to start logging with a engine RPM over 2500 and a TPS
position over 50% then you would use this formula rpm < 2500 && tps < 50.

If you choose your start logging parameters as automatic but leave your stop
logging in manualmode then it will start once your engine reaches your set
parameters and stay logging until you shut it of manually or shut the engine off .

Performance and Economy Fields

powerAndEconomy

Available in TunerStudio 2.3 and up.

View and Log Horse Power, Tq, Fuel Economy, Trip Meter, Fuel Consumption!

Performance and Economy fields are simply turned on for you to start monitoring the Power and Fuel economy of your vehicle. All you need is either a speed channel from your ECU or a GPS attached for TunerStudio to capture speed from. When using a GPS and 10Hz GPS is required.

In this section I will be going over how to fill in the required information for using the performance and economy fields.


Performance Fields :

 The performance fields allow you to make calculated estimation of several different types of data like Aerodynamic Drag, net HorsePower ,
net Torque, and Rolling Drag .


Economy Fields :

The economy fields allow you to make calculated estimations of several different types as well. Your distance traveled in your fuel
consumption “MPG” “MPL” “KPL” , the rate at which you are pumping the fuel into the engine “CC per min” “gallons an hour” “lbs per hour” ,
 and instant measure of distance vs. fuel consumption, this is similar to the first calculation I talked about in the economy section but with
 a slight difference the first calculation is the distance traveled and fuel consumed over a long distance or extended sample range, where
the instant will give you the calculated fuel you are using that very second as you mash the accelerator down.


GPS Support

 satalite78                         

In TunerStudio version 2.2 and Up!

speedometer
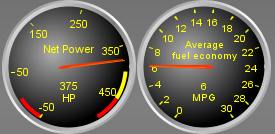
GPS Support: You will find the integrated GPS support very helpful in many ways and quickly will not want a data log without it. Once a GPS is setup in TunerStudio, all the common GPS fields plus more are included in your regular data logs and a new group of GPS gauges will appear on the right click menu. When using a 10Hz GPS you can then enable Performance & Economy Fields for things like HP, Tq and Fuel consumption become fully integrated with your TunerStudio Project therefore are available for display on gauges and will be captured in your data logs. These fields include:

  • Latitude - GPS Latitude
  • Longitude - GPS Longitude
  • Heading - GPS Direction you are traveling
  • Accuracy - Reported GPS Accuracy based on visibility and quality of your GPS device
  • Altitude - GPS Altitude in Meters
  • GPS.PositionX - A relative position in meters along the East-West axis from the point in which you first aquired GPS lock.
  • GPS.PositionY - A relative position in meters along the East-West axis from the point in which you first aquired GPS lock.
  • GPS_Time - Standard GPS Time in ms.
  • GPS_Update - Will show as 1 each time the GPS data was updating for that log record, 0 if it is the same data as the last record.
  • MPH - Speed in MPH
  • KPH - Speed in KPH

For each of these Fields you will find a Gauge to display the values in real-time. To change a Gauge to show the GPS field, right click on it ans select:
Application Gauges --> The gauge of your choice.


Supported GPS Devices - There are many GPS dongles you can purchase for your Laptop that should be compatible. The typical integration is a Virtual Com Port over USB or Bluetooth. However, you will find that as with most things, the quality will vary between devices, especially when used in a performance environment. The vast majority of GPS dongles are only capable of 1 update per second. While this is sufficent for the typical navigation system, it does not provide the data rate you will want in a performance motor sports situation or if you want a steady and reliable speedometer. It should also be noted that some devices take a great deal longer to aquire a satallite lock and operate with far fewer channels.
For your best experience you will want a GPS capable of 10 Hz, that is 10 updates every second. That means that when you are capturing a data log, you will have updated GPS data 10 times more often for much finer grain positioning and speed logging. This also means the speed data can be used for HP calculation in TunerStudio and MegaLogViewer with far better results.
Recommended GPS Device:
QStarz BT-Q818XT - 10 Hz, 66 Channel, 115200 baud that works over USB or Bluetooth so it can be used on your Android device as well. You can find GPS dongles for half the price, but they only deliver 1/10th the data.


GPS Setup:
1st consult the documentation that came with your GPS. The documentation will state the supported baud rate.
2nd, connect the GPS dongle to your PC. If it is connected via USB, make sure you have installed any required drivers.
If running Windows, a COM Port will be assigned to your device. It is sometimes easiest to find out what port was assigned by going into Windows Device Manager,
expand the node for "Ports (COM &LPT)", there are typically only a couple devices there, one is most likely the port you use to connect to your ECU, so in this case, try the other.
- Bluetooth, If you are using bluetooth to connect, you will need to pair with the GPS, it will then be assigned a COM Port as well.


TunerStudio Setup: Once you have your GPS device connected to your laptop, you will connect to it by selecting the proper com port and baud rate in GPS settings.
In TunerStudio on the Main Menu, select:
Communications --> GPS Configurations

In the GPS Configuration Dialog
- Check "GPS Enabled"
- Select the Connection Type "RS232 Serial Interface"
- Select the COM Port you found in Device Manager
- Set the baud found in your device documentation. For the QStars it is 115200, for most other GPS's it is 9600 baud.

You will then need to restart TunerStudio to have all the GPS channels available.
You can select any of the GPS gauges by right clicking on a gauge and selecting the gauge of choice under the GPS menu

TunerStudio System Requirements

Almost any modern computer laptop will run TunerStudio to it's full potential. If you have a very old laptop for tuning with say a Pentium II or older, the following may help:


Typically a 1 GHz processor is more than enough to run TunerStudio well, TunerStudio was designed to insure it could run on old slow tuning laptops. There are people running on 366MHz Laptops :). The biggest variable beyond processor is the Video chipset and driver. So if you are using an older laptop, you may want to adjust some of the more resource intensive options as they can have a significant impact on performance.
If using a very old laptop, Here are a list of changes that have significant performance impacts:

  • Dashboard Anti Aliasing - Right Click on the dashboard and there is an option for Antialiasing. This being on has little to no impact with good video drivers, however on older machines, antialiasing being on can double CPU usage.
  • Dashboard selection - The default dash with the 8 gauges has no gauges overlapping, the cooler ones do overlap gauges. When gauges have no overlapping I can perform some additional optimizations that have a significant savings. So try the default dash.
  • Data Rate - Under the communications Menu, there is a dialog for Data Rate, the higher the data rate the more paining that will be triggered and more calculations that are required. Keeping that at 15 or even 10 Records Per Second is probably a good idea on slower machines.
  • Modal Dialogs - Under the Menu "Options-->Performance-->Modal Dialogs" , this options will stop painting the dashboard while any dialogs are open so your CPU can focus on the dialog at hand. Any data logging continues.
  • The Run In Lite Mode options eliminates the tabs, but sets several of these other options at once.

Operating Systems

  • Windows 7
  • Windows Vista
  • Windows XP
  • Windows 8
  • Apple OSX - Leopard and above
  • Linux - most flavors. Packaged for x86 processors, primarily tested on Ubuntu

Use on other platforms can be accomplished as long as the OS meets the JRE requirements and you can provide the appropriate RXTX driver. For adapting to other platforms it is easiest to download the Linux tar.gz file as that will run on all platforms as is and simply needs the appropriate RXTX driver placed in the lib folder.

Java Runtime Environement

JRE 1.6 or 1.7is required, .

Recommended System Specifications

  • 1.5 GHz Processor
  • 1 GB RAM
  • Proper Video Drivers for your video chipset
  • DB9 serial port or USB with FTDI based USB to serial cable.
  1. MegaSquirt 3 SD Card Console in TunerStudio MS!
  2. Cables and Adapters
  3. Changing Gauge Limits
  4. TunerStudio User Reviews

Page 5 of 7

  • 1
  • 2
  • 3
  • 4
  • 5
  • 6
  • 7
EFI Analytics, Inc © 2023