• Home
  • Products
    • TunerStudio MS
      • Registered TunerStudio Advantages
      • TunerStudio Articles
    • MegaLogViewer
      • MegaLogViewer HD
    • Shadow Dash MS
      • Requirements
    • TS Dash
    • Connectivity
  • Support
    • FAQs
    • Manuals
      • Developer Manuals
    • MegaSquirt Forums
    • How To Videos
    • User Reviews
  • Downloads
    • TunerStudio Change Log
    • MegaLogViewer Change Log
  • Editors
    • Login
  • About EFI Analytics
  1. Home
  2. Products
  3. TS Dash
  • Home
  • Products
    • TunerStudio MS
    • MegaLogViewer
    • Shadow Dash MS
    • TS Dash
    • Connectivity
  • Support
  • Downloads
  • Editors
  • About EFI Analytics

Using Digital In/Out Pins with TS Dash

TS Dash supports both digital Input and Output with Raspberry Pi GPIO. The state of configured Input and Output pins can then be represented by an Output Channel for display on a dashboard or in a data log. Here we will demonstrate the configuration of a digital Out and digital In.

Digital Out

In this demonstration of configuring a Digital Out, we will create a Shift light where TS Dash will light an LED when the engine speed reaches 6000 RPM. 

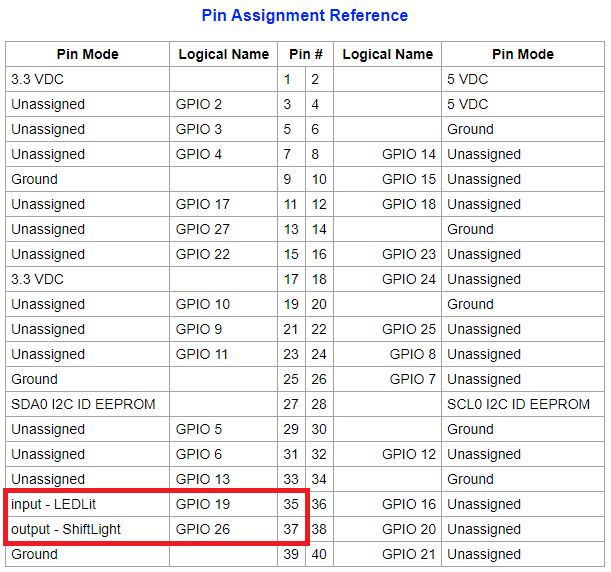
Starting with the wiring, we select a Raspberry Pi pin to use. In this case we will use GPIO 26 which is found on the 40 Pin connector in position 37. We will connect that to the positive side of the LED. The negative side of the LED will be connected to to ground through a resistor to limit current. The connected 3.3 volt wire is not used in this case even though it is connected as we are going to supply the 3.3 volts from GPIO 26.
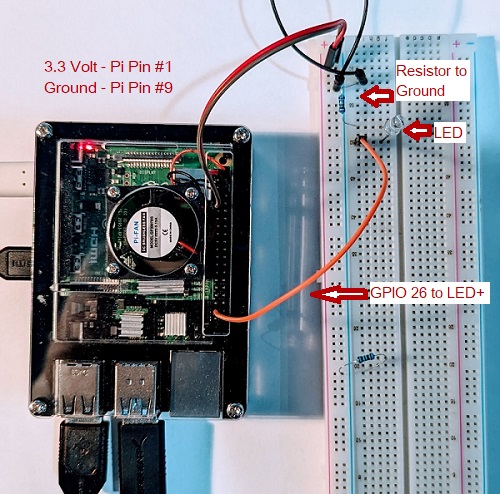
Digital Out Wiring

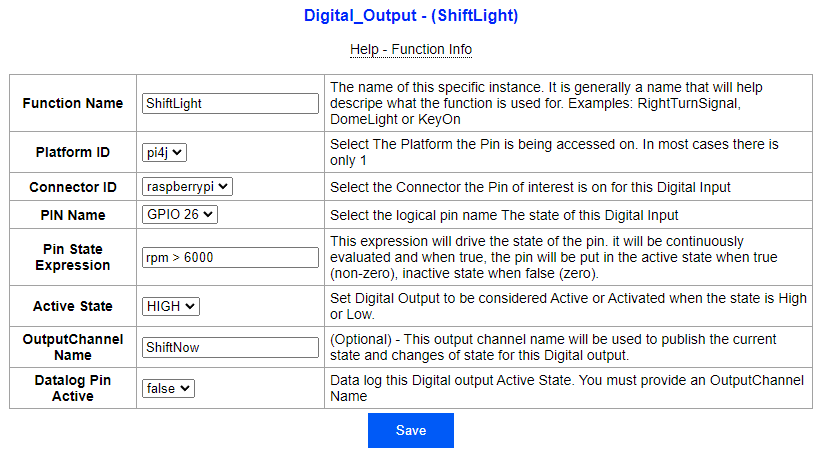
Now in the TS Dash configuration site we go to the Pin Management Page were we can configure GPIO 26 as a Digital Output controlled by TS Dash. On the Pin Management Page, we start by clicking on "Add new" under "Digital_Output". This takes us to where GPIO 26 can be set up as a Digital Output. We assign the function name of "ShiftLight" and assign GPIO 26. The expression assigned to drive the state is "rpm > 6000" and assign Active State to "HIGH".  With this configuration, TS Dash will keep GPIO 26 in a low state when the expression is not true and a high state when it is true. In this case the pin will be held high when RPM's are greater than 6000 and Low when RPM's are lower than or equal to 6000 RPM. We also assign the optional OutputChannel name of "ShiftNow" so we can later configure a dashboard indicator to show the LED state.
Note: You could also set the Active state to LOW and connect GPIO 26 to the ground side of the LED and supply continuous 3.3v to positive side of the LED. In this scenario, GPIO would be held high when the expression is false, and low when the expression is true acting as a ground to complete the circuit.

Click Save and you will return to the "Pin Management" Page. There will be a notice of "Changes require restart to take effect"

By Clicking "Reinitialize Now", the TS Dash app will be restarted. It will not trigger a full reboot of the Pi.

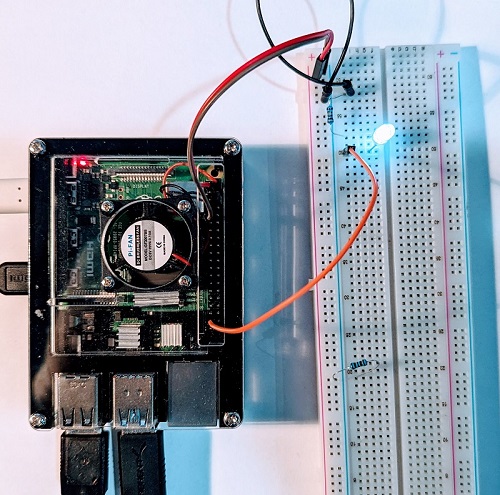
Your shift light should now be operational. If you raise the RPM's over 6000, the LED will light. Below 6000 and the LED will be off.

Digital In

For our Digital In example, we will build upon our Digital Out by adding a wire connected to GPIO 19 (Raspberry Pi Pin# 35) that will monitor the state of the LED. Thus, when GPIO 26 goes high and  lights the LED, it will also drive GPIO 19 high changing the state of the Output Channel we assign to our Digital In.
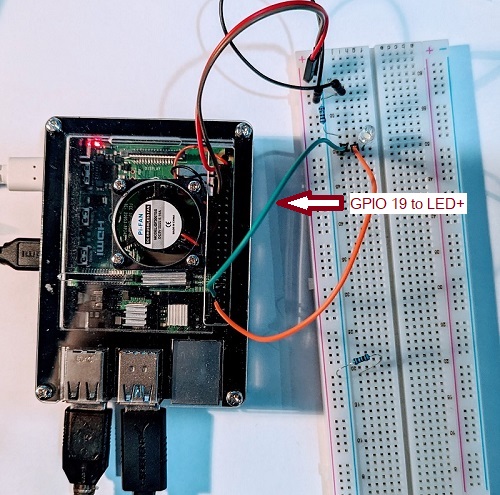
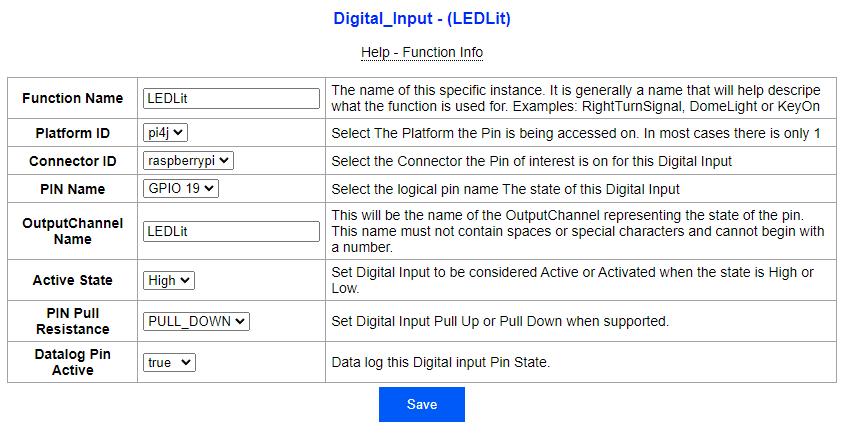
Now in the TS Dash configuration site we go to the Pin Management Page were we can configure GPIO 19 as a Digital Input monitored by TS Dash. On the Pin Management Page, we start by clicking on "Add new" under "Digital_Input". This takes us to where GPIO 19 can be set up as a Digital Input.  Here we assign a Function Name of LEDLit and assign the Pin GPIO 19. For inputs, the Output Channel name is required as that is the entire point in a digital in, creating an OuputChannel that represents the state of a pin. That OuputChannel can then be used for dashboard indicators or used in expressions to drive other functions or actions. For this example, we assign the Output Channel name "LEDLit" and an Active state of "HIGH" to match that assigned to the Digital Out we created above.
Click Save and you will return to the "Pin Management" Page. There will be a notice of "Changes require restart to take effect"

By Clicking "Reinitialize Now", the TS Dash app will be restarted. It will not trigger a full reboot of the Pi.

Your Digital In should now be functioning. The Output Channel LEDLit will represent the state of GPIO 19 with a value of 1 when the LED is lit and a value of 0 when it is not. To see this, we will set up an indicator on a dashboard to light when the LED is on. While we are at it, we will also create an indicator that is assigned to the optional OutputChannel we assigned to our Digital Out on GPIO 26. To do so we will go into Dashboard Designer Mode:

  • Go to the dashboard of your choice in TS Dash. 
  • Right click on the dashboard and select "Designer Mode"
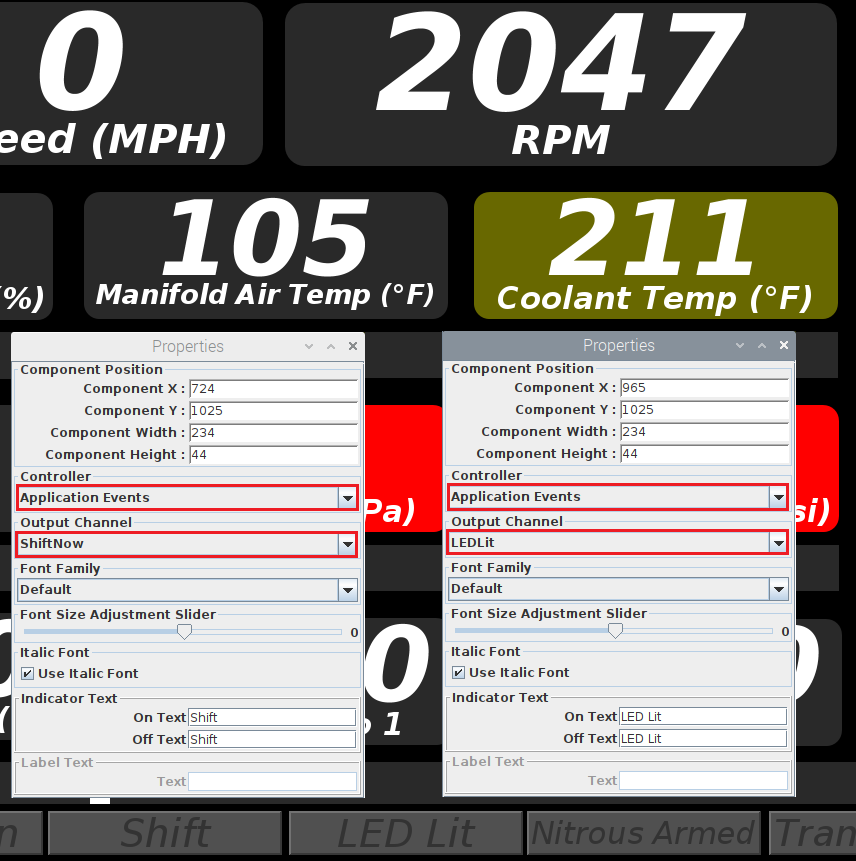
  • Right Click the indicator your want to use, select "Dashboard Designer" --> "Properties Dialog"
  • Under Controller, select Application Events
  • Now, under Output Channel select the Output Channel we assigned to the digital in "LEDLit"
  • Change the Indicator Text to something more appropriate such as "LED Lit"
  • Repeat the process for the Output Channel ShiftNow that we assigned to our Digital Output
  • Right Click on the dashboard and uncheck "Designer Mode"
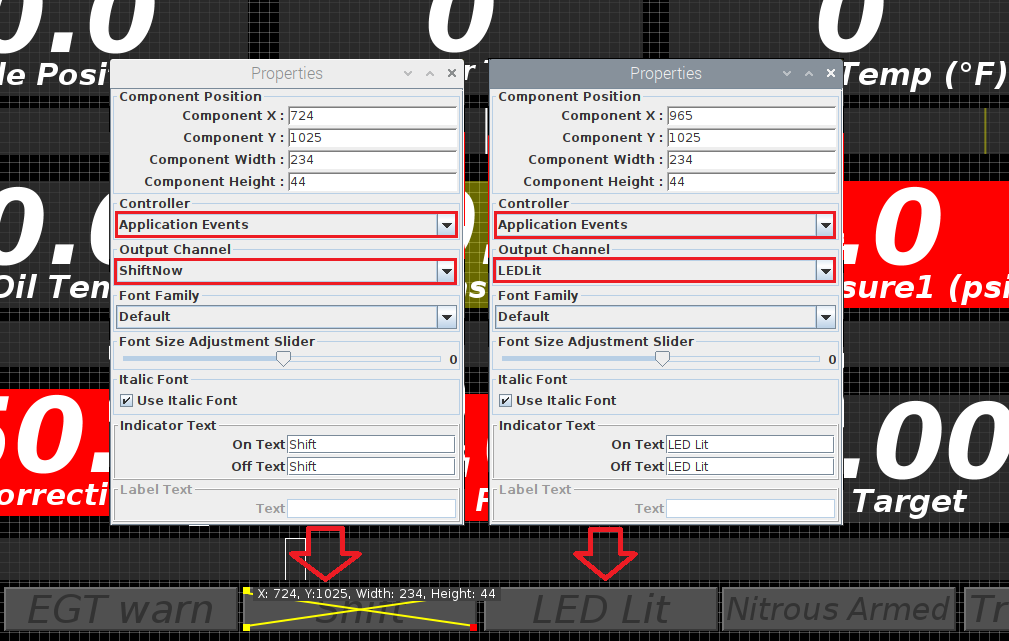
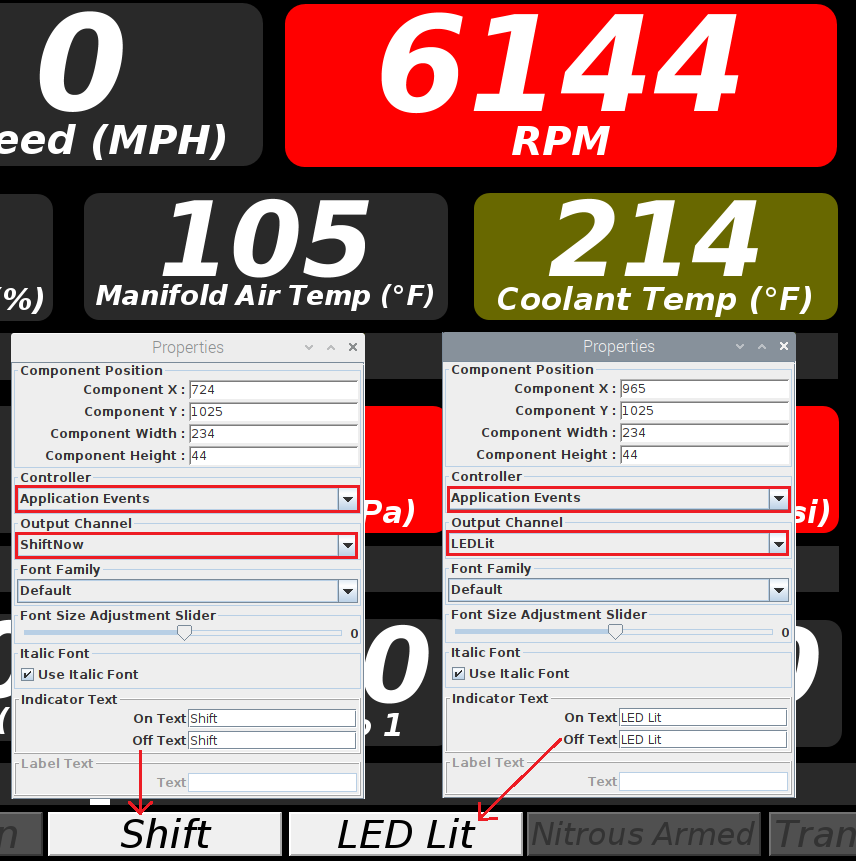
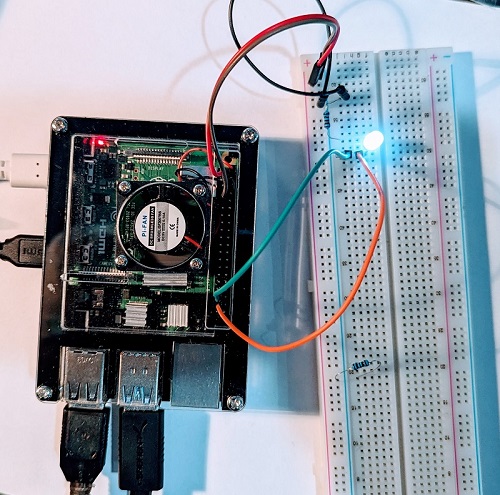
Now, not only the LED will light up when we exceed 6000 RPM, but both indicators will light on the dashboard as well.

Below 6000 RPM:

Over 6000 RPM:
 

On each of the Pin Management editing page, you will be able to see the pins assigned.
TS Dash Shutdown

A Raspberry Pi should be shut down cleanly before removing power to prevent corruption to your SD card..

With TS Dash, this can be done by any of the following:
 
- Use the Shutdown Manager
- Create an action that is triggered by an expression.
- Sending a key ALT+F5 several seconds before removing power. Alt+5 will immediately cleanly exit TS Dash and shutdown the OS.

Shutdown Manager

The TS Dash Shutdown Manager has the capability of managing a power supply. For example Mausberry circuits offers a power supply for use in cars.
https://www.mausberrycircuits.com/collections/car-power-supply-switches/products/4amp-car-supply-switch

Attention! We do not recommend Mausberry  circuits at this time. They commonly take months to ship and the circuit fails very frequently. 
We are currently evaluating some other options to recommend.

This power supply has 2 pins that connect to the Raspberry Pi. One pin that is held high when the key is on, low if the key is off.
The other Pin must be held high by the Raspberry Pi to keep the power on. The power will remain on only for several 2nds when the pin goes low.

They supply a script to manage these pins, but with TS Dash it is recommended you do not install the script and let TS Dash manage the Pins. This allows TS Dash to perform a clean shutdown of itself and the OS before then letting the pin go low to effectively cut its own throat.

This also allows you to set a period of time before it will shutdown after the key is turned off. I generally have the LCD panel turn off with the key, but set TS Dash to not power down for 30 minutes or so. Sitting idle, the Pi will use very little of your cars battery in 30 minutes, but you will have an instant on dash when you turn your car off, then back on again within that 30 minutes. You may want more or less time, that is configurable in the TS Dash Setup site.

Configuring TS Dash Shutdown Manager

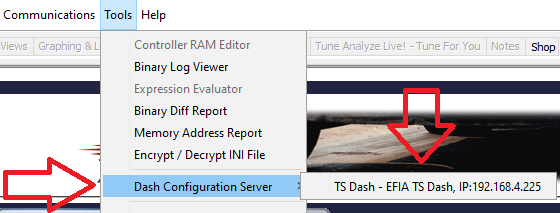
With your TS Dash on the same network as your Laptop, Open TunerStudio. If TunerStudio detects a TS Dash on the same network, it will list it under the Tools menu:

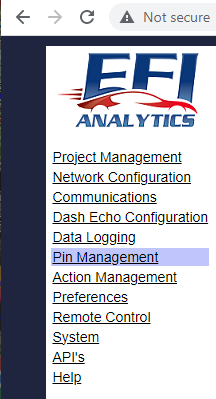
By clicking this menu, the TS Dash setup site will open in your web browser. From there, select the "Pin Management Menu"

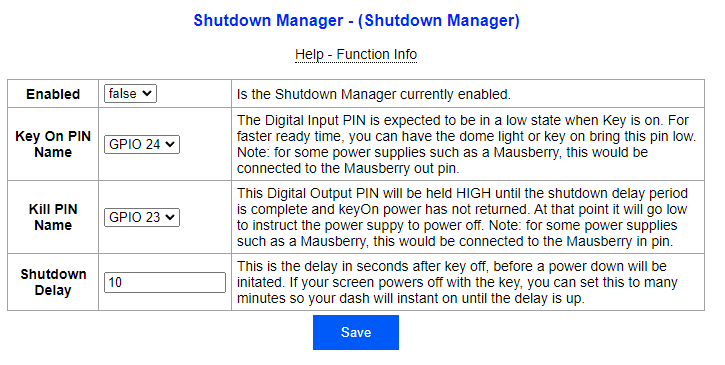
At the bottom of the page will be the Shutdown Manager Configuration. 
To Edit or enable the Shutdown Manager, click on the pencil.


Use an Action to Shutdown cleanly.

An alternate way to shutdown cleanly is to set up an Action in the TS Dash setup site. The shutdown can be triggered by any expression, but the most common would be by a pin state change on the Pi. If you set up an Input Pin to detect a key on condition, and using a delay circuit on the power supply, but at that point you might as well use the Shutdown Manager.

However, this is an option if you come up with some scenario that needs it.

TS Dash Requirements

TS Dash was made with the Raspberry Pi in mind and that makes a great platform. However, it can be used with all operating systems that TunerStudio supports.
- Windows 7, Vista, 10 & 11
- Linux
- Mac OS

Raspberry Pi

TS Dash works well with Raspberry Pi 3+, Raspberry Pi 4 with 2GB RAM is recommended.

If you start with the provided reference image from the download site, everything will be installed and ready to go.

However, if you are setting up TS Dash on something other than a Raspberry Pi (Windows, Linux, Mac OS), download the .tar.gz or .zip file.
Expand that into a folder on your PC. You will need to install a JRE. JRE 8 or 11 are recommended.
Download one here

If you are working on your own Raspberry Pi and want to take advantage of reading or setting Pin states, you will need to install Wiring Pi.

Wiring Pi installation instructions can be found here

Raspberry Pi TS Dash Setup Instructions

Other Platforms

TS Dash will only a require a JRE for your operating system. Pin Management will be unavailable.
JRE 8 or 11 is recommended. It can me downloaded from here.

Once you have a JRE installed, extract the TS Dash folder from the zip or tar.gz file downloaded from here.
You can run TS Dash by running the TSDash.sh file on Linux or Mac OS, on windows, double clicking the TSDash.jar file will start the application.

Getting Started with TS Dash

Getting Started
Viewing Log files with
MegaLogViewer & TunerStudio MS Ultra

Hot Keys

Important! TunerStudio version 3.1.08.15 or greater required. At the time of this writing, that means the beta version is required.

Getting Started

While you can do much of your configuration within the dashboard itself by going to the Configuration section (CTRL+Up Arrow), in most cases it is best to configure TS Dash from a web browser on your PC or Laptop. Once your dashboard is connected to a WiFi network, TunerStudio and MegaLogViewer will see the dashboard and help in accessing it.


The "Dash Configuration" Menu will appear in TunerStudio under the Tools menu when ever TunerStudio sees 1 or more dashboards on the network.
By clicking this menu, a web browser will open to the dashboards integrated web server. from here you will be able to setup and configure your dashboard.
To start using your dashboard, TS Dash will need a TunerStudio Project.
From the Project Management menu, you can select one of the example projects, or upload your own project.
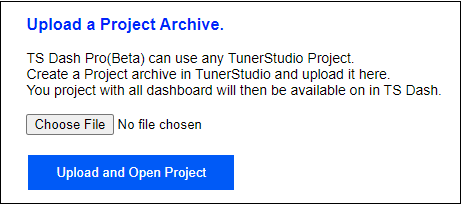
Upload your Project - In TunerStudio create a Project Archive under the menu:
File --> Vehicle Projects --> Create Project Backup


Now switching back to the Dash configuration web page for "Project Management", upload that backup file using "Upload a Project Archive"
Choose your file, then click "Upload and Open Project".


Your project should now be open on your dashboard.

Viewing Log files with
MegaLogViewer & TunerStudio MS Ultra

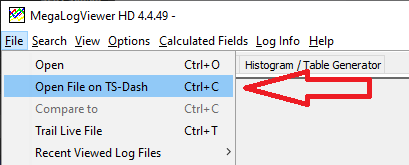
Current releases for TunerStudio MS Ultra, MegaLogViewer MS and MegaLogViewer HD have the ability to open log files directly from TS Dash if the app is on the same network as TS Dash. To do this, take note of a new Menu option in MegaLogViewer under the File menu:


and in TunerStudio MS Ultra on the Graphing & Logging Tab:


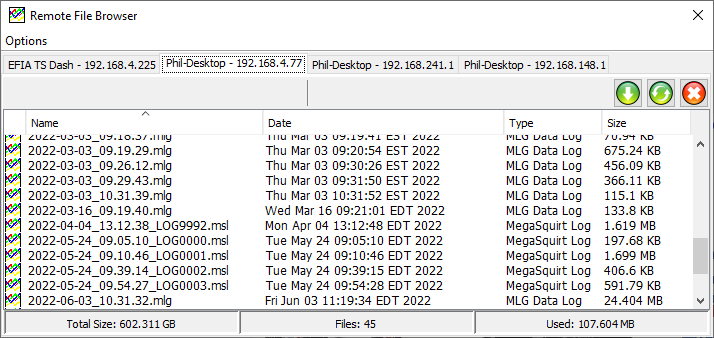
These menus will open the browse dialog.


From the Log Browser, double clicking a log will download and open the log. Note: by default, if there already is a local version of the log, it will not download it again. 

Hot Keys

A list of hot keys that work with TS dash.

CTRL+L Start Data Logging
CTRL+K Start Data Logging
ALT+F3 or ALT+F4 Exit App
ALT+F5 Exit App & shutdown OS
ALT+c Show Communications Settings Dialog
CTRL+o Show open Project Dialog
CTRL+p Show open Project Properties Dialog
CTRL+r Restart App
CTRL+w Toggle Online State
CTRL+[Right Arrow] Move to dash on Right
CTRL+[Left Arrow] Move to dash on Left
CTRL+[Up Arrow] Move to to screens up, such as config
CTRL+[Down Arrow] Move to to screens below, such as back to dash
CTRL+d Toggle on/off Comm Debug mode

TS Dash Setup

Installing TS Dash

There are 2 primary ways to set up TS Dash:

Using the reference image - For quickest set up, this is a turn key image, write it to your SD card as your would with any Raspberry Pi image.
Installing to your Raspberry Pi - Install it to your own image or OS

Using the reference image

Download latest TS Dash reference image here. This image should continue to improve especially with community contributions. This image does not currently work with Pi 5

This image has preinstalled:

  • Java runtime environment
  • TS Dash including WiringPi
  • TunerStudio MS Beta
  • MegaLogViewer HD
  • MegaLogViewer MS
  • VNC - For remote control of your dash from your laptop or PC. Use VNC viewer to connect 

When booted, this image will create a WiFi hot spot named "TSDash". By connecting to this WiFi hotspot, you will be able to Connect TunerStudio as a Dash Echo Client for tuning, data logging etc. You will also be able to open logs directly from your dash in TunerStudio or MegaLogViewer. 
By adding a 2nd WiFi with a USB dongle, that can then be used to connect to your house or shop WiFi, or even your phones hotspot. Once you do that, the Raspberry Pi will act as a full hot spot providing internet access to your Laptop.

These add-ons in the image are started in a lazy fashion in order to not lengthen boot time.

Default user / password:
User: pi
PW: raspberry

WiFi hotspot:

SSID: TSDash
passcode: raspberry


Note! The 1st boot on this image will take much longer than normal as the image resizes itself to your SD card. Be patient, the black screen will go away after a couple minutes.

Installing on your own image

However, if you want to set up TS Dash on your own Linux install or create your own image, here is a list of dependencies and how to install them. The assumption here is that you are using Rasbian or Raspberry Pi OS. 

- JRE - (Java Runtime Environment). 
- Wiring Pi - Updated version supporting Raspberry Pi 5

JRE

TS Dash has been tested with several version of JRE's. Best performance has been found with Open Java 8. 

Installation:

Open a Terminal, enter the following commands:sudo apt update
sudo apt install openjdk-8-jdk

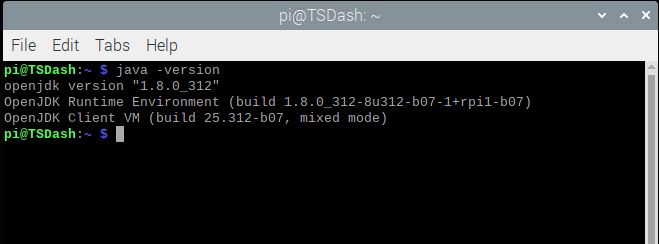
Verify your install with:

java -version


Wiring Pi:

Wiring Pi is required if you wish to use the raspberry Pi pins for IO. Some distros have WiringPi Pre-installed. you can test to see if it is installed with the following command:

gpio -v

If you get command not found, you will need to install Wiring Pi

Follow the instructions found at:
http://wiringpi.com/wiringpi-updated-to-2-52-for-the-raspberry-pi-4b/

or run these commands:

sudo wget https://www.efianalytics.com/TSDash/download/wiringpi-latest.deb
sudo dpkg -i wiringpi-latest.deb

  1. EFI Analytics - Dash Echo

Page 1 of 2

  • 1
  • 2
EFI Analytics, Inc © 2023